Saturday, September 13, 2014

Paleo Pineapple Whip

   
paleo pineapple whip
     I hate how all paleo frozen desserts have banana in them. Some people hate bananas. What about us? Banana Haters, unite! Ok, you don't have to hate bananas to love this. It's a recipe for the masses.

     Unless you hate pineapple.

     This is one of my favorite recipes. It's paleo, clean eating, Whole 30, low carb, tasty and easy as heck. It makes a great dessert or snack or even breakfast.

     My favorite thing about it is that it has just one ingredient, pineapple!

     Just take a can of crushed pineapple, dump it in something tall and sort of narrow but wide enough for a stick blender and make sure it can withstand being frozen.
    

Add caption
     After it's frozen pretty solid, set it out on the counter to thaw a little, around a half hour. Then hit it with the immersion blender.


Voila! Pineapple whip!

Organix Brazilian Keratin Therapy 30-Day Smoothing Treatment Review


Organix Brazilian Keratin Therapy 30-day Smoothing Treatment kit
     I don't know about you, but I love trying out anything that makes my hair shinier. I don't need help in the straight department, but as for shine I'm always looking for new treatments to try. I've used this kit a few times and I love it so I thought I'd give a review in case anyone was on the fence about trying it.

     The directions are pretty straightforward and easy to follow. 
First, you wash your hair with the shampoo packet enclosed. Don't use conditioner and let air dry just a bit. *If you plan to use the kit multiple times, keep in mind how much shampoo you'll need for other applications and conserve some of it.

Next, put on the gloves and shake the bottle and apply the treatment and comb it through. I have learned that less is more. The first time I used the kit I applied almost the entire bottle and it crusted up and left flaky gunk in my hair. Use just enough to coat your hair. Let sit 30 minutes.

Third, blow dry your hair, pulling it straight with a brush. Make sure it's totally dry.

Last, flat iron your hair. Turn up the iron as hot as it will go. Make several, quick passes over each section of hair. This can be a bit tricky because starting as soon as you dry it, you can't pin or clip your hair for 48 hours. You can't even tuck it behind your ears. I usually run the vent in the bathroom while I do this, the smell is kind of strong. (I use the Remington Wet 2 Straight Flat Iron. You can actually set it to flat iron wet hair without damaging it!)

Don't wash your hair for at least 2 days. I cheat and use a bit of dry shampoo. You have to keep your hair as straight as possible too. No tucking it behind your ears, no bobby pins, barrettes, ponytails, no ball cap, etc. Every morning, during the 2 days until I wash my hair, I run a flat iron over it to get out the kinks from sleeping on it. It helps combat the greasies too!

I have fairly long hair (as you can see) and each kit has lasted me 3-4 uses (except for the first one, due to using too much of the product on my first try).


Unreal shine!
back view

NOTE: I haven't been compensated by Organix or Remington in any way. I just love their products!

Running Belt


     If you know me at all, you know I'm anti-running and pro-walking (but that's a post for another time).  That said, I didn't know what else to call this project in order for people to find it in a search.
   
     I am an avid walker and I have a few, um, let's call them "quirks". When I exercise, or am hard at work at anything really, I can't stand any hair touching my face or my neck and I carry weights so I can't carry my keys, etc. I also am a middle-aged mom so I worry about every single awful thing that could happen to a person in generally any given situation. I am scared to death to go for a walk without my keys, phone, debit card and a photo ID.
Carrying a bag that bangs against my hip while I walk is out of the question.
Jingling my keys while I walk? Nuh-uh.
I also can't reconcile myself with the idea of a fanny pack either.

     I found the perfect solution online called a FLIPBELT. As soon as I saw the $30 price tag I couldn't help but think I could make one cheaper and have it faster than the time it would take to be shipped to my house. I also liked the idea that if I lost weight I could take it in a bit.
So this is my super easy version of the FLIPBELT. Check out my other post on my version of Sweaty Bands.http://appalpie.blogspot.com/2014/09/no-slip-headband.html

STEP 1: Cut Out the Fabric
     Measure where you want to wear the belt (your waist or hips). Take that number and add an inch to two inches for a seam allowance. Decide how tall you want your belt (I made mine 4"). Take that number and double it and add a seam allowance. Mine was 9". So my belt was 9" tall by my body measurement plus 1".

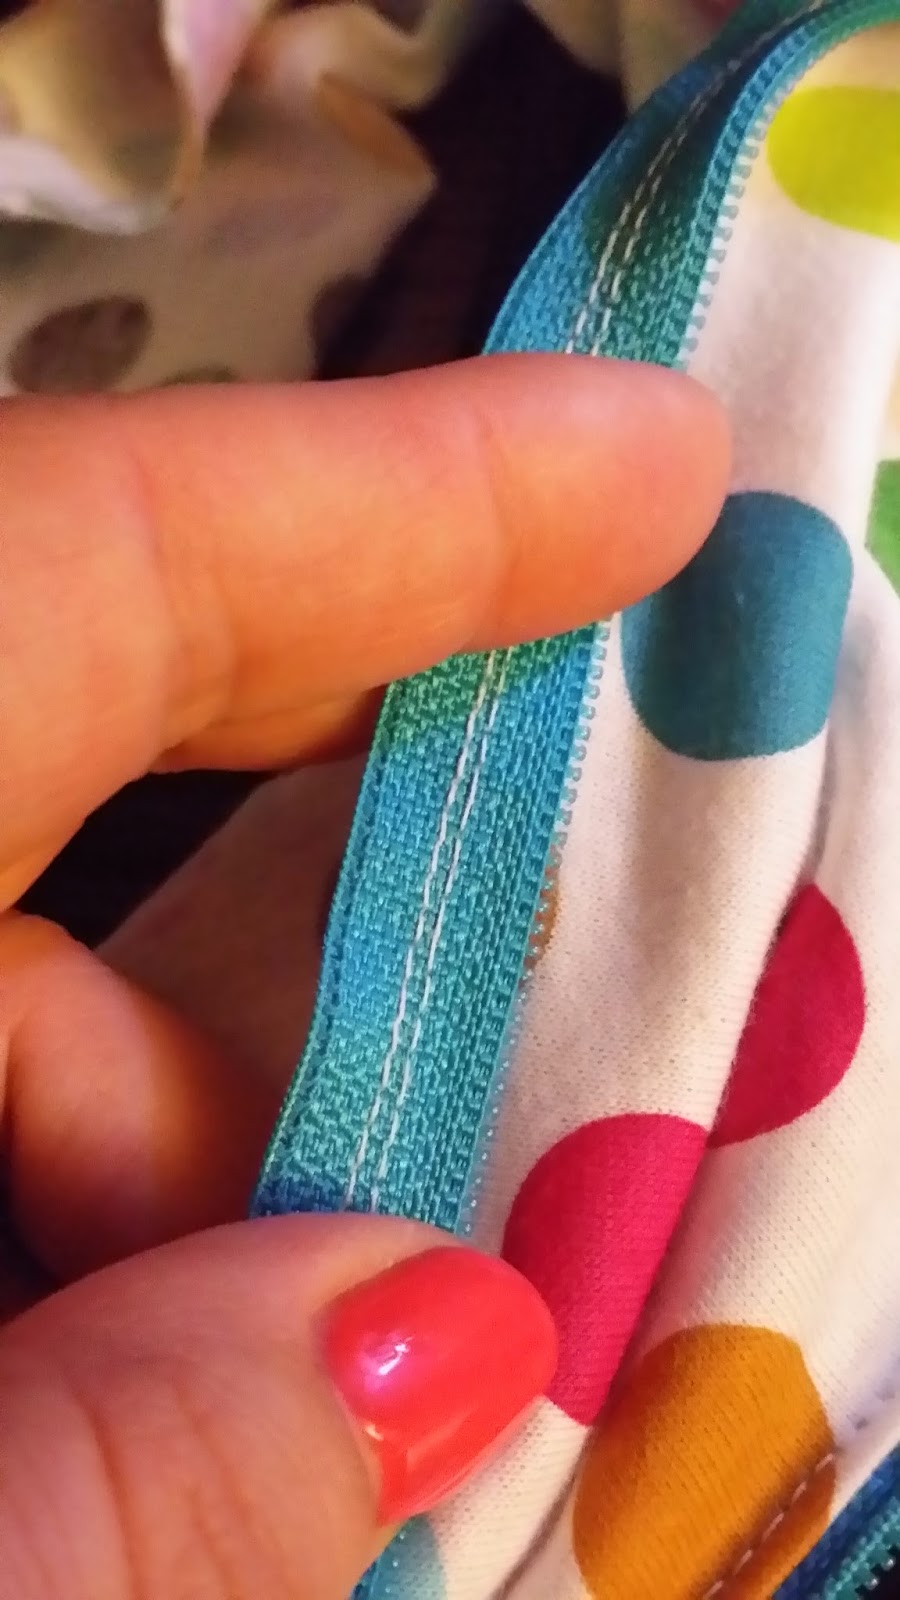
STEP 2: Put in the Zipper
     Find the middle of your fabric and find the middle of your zipper. Match up the middle points and pin the zipper in place. Line up the edge of the right side of the fabric and right side of the zipper. Sew the zipper down pretty close to the teeth.
Sew down the zipper right sides together.
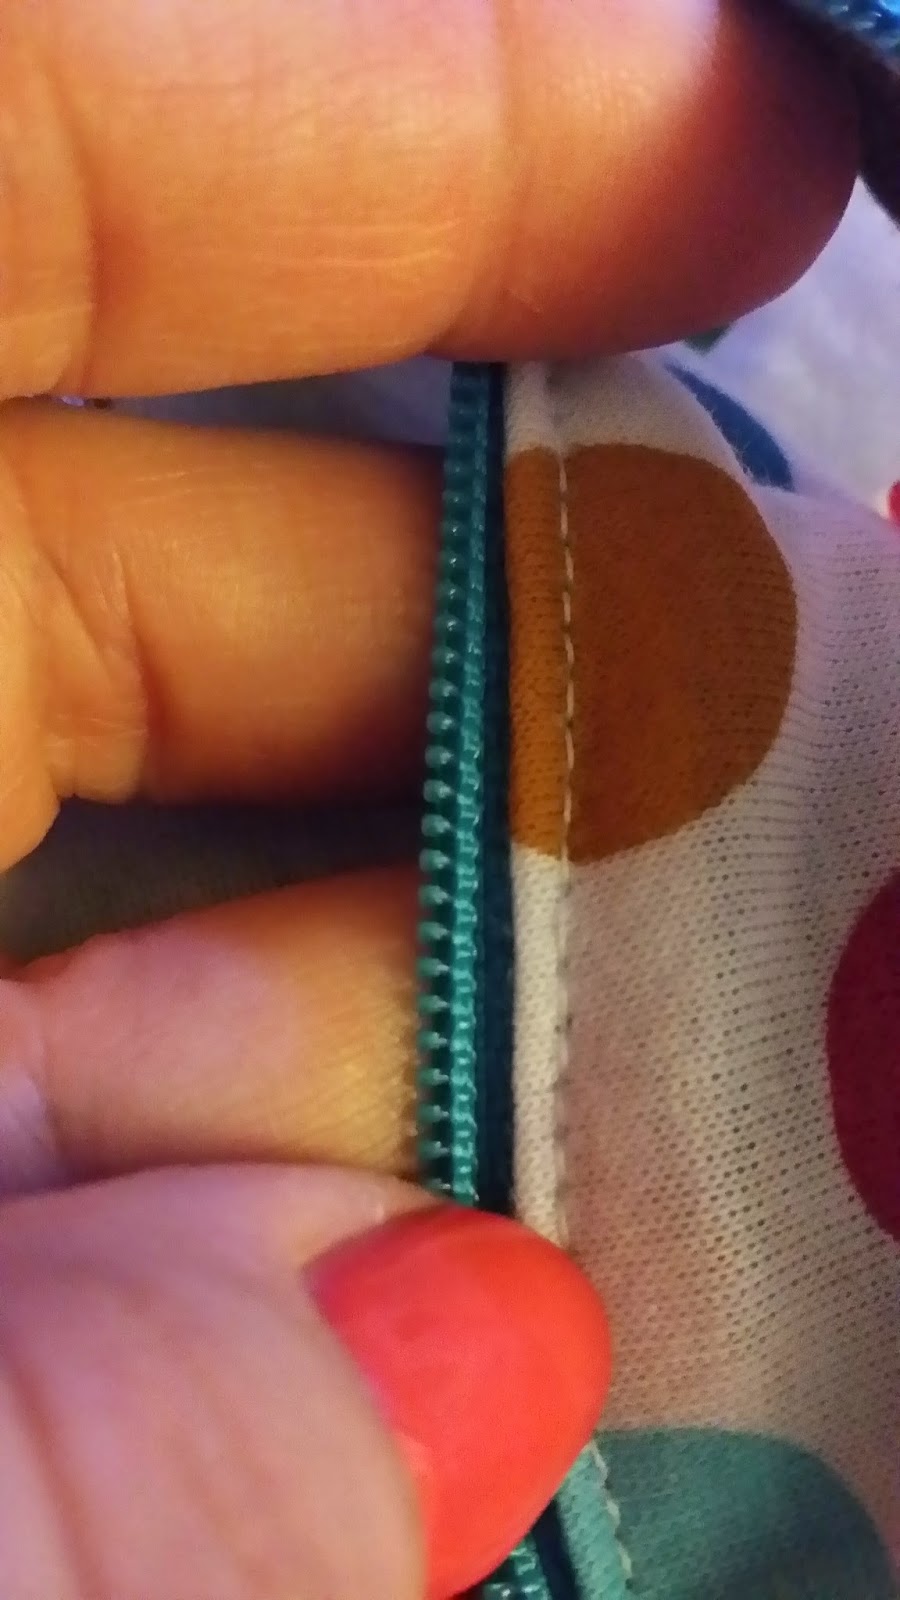
     Next, flip over the zipper and sew it down so the fabric doesn't get caught in the teeth.
Sew down the fabric so it doesn't wind up caught in the teeth.
     Zip up the zipper and make sure both sides match up.
back side of zipper
STEP 3: Sew Up the Length
     Starting at the ends of the zipper, pin together the belt with right sides together. Sew.
Sewing up the length of the belt.
STEP 4: Sew Up the Ends
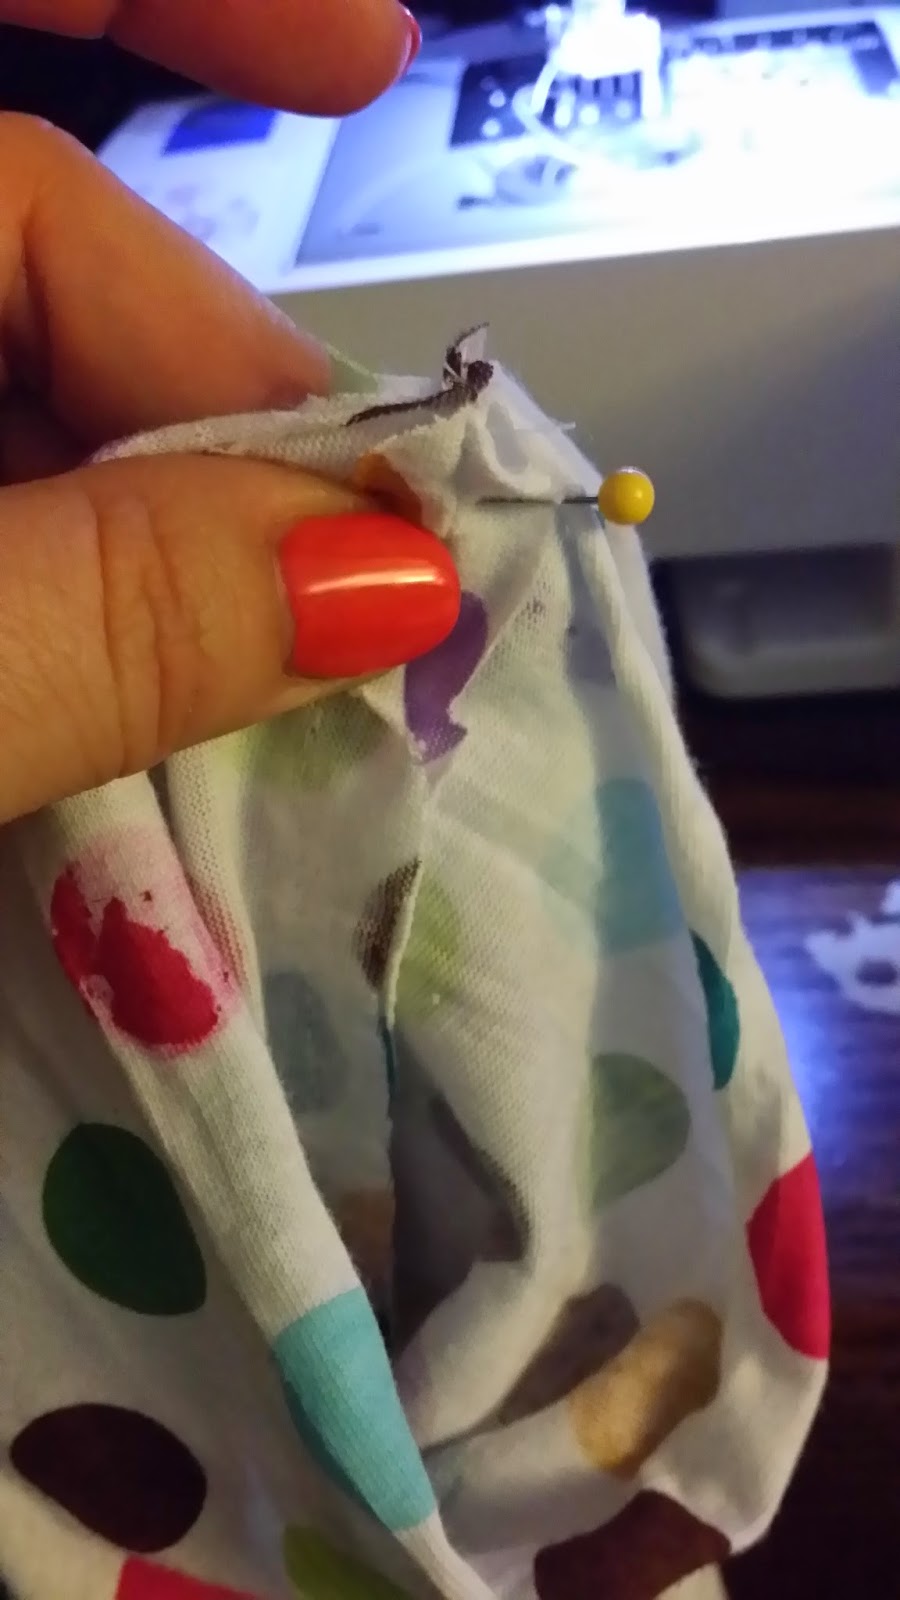
     Here's the tricky part.  *UNZIP THE ZIPPER BEFORE YOU BEGIN THIS STEP.*
Pin together the right sides all the way around in a circle, starting at the seam.
Starting at the seam, pin right sides together.
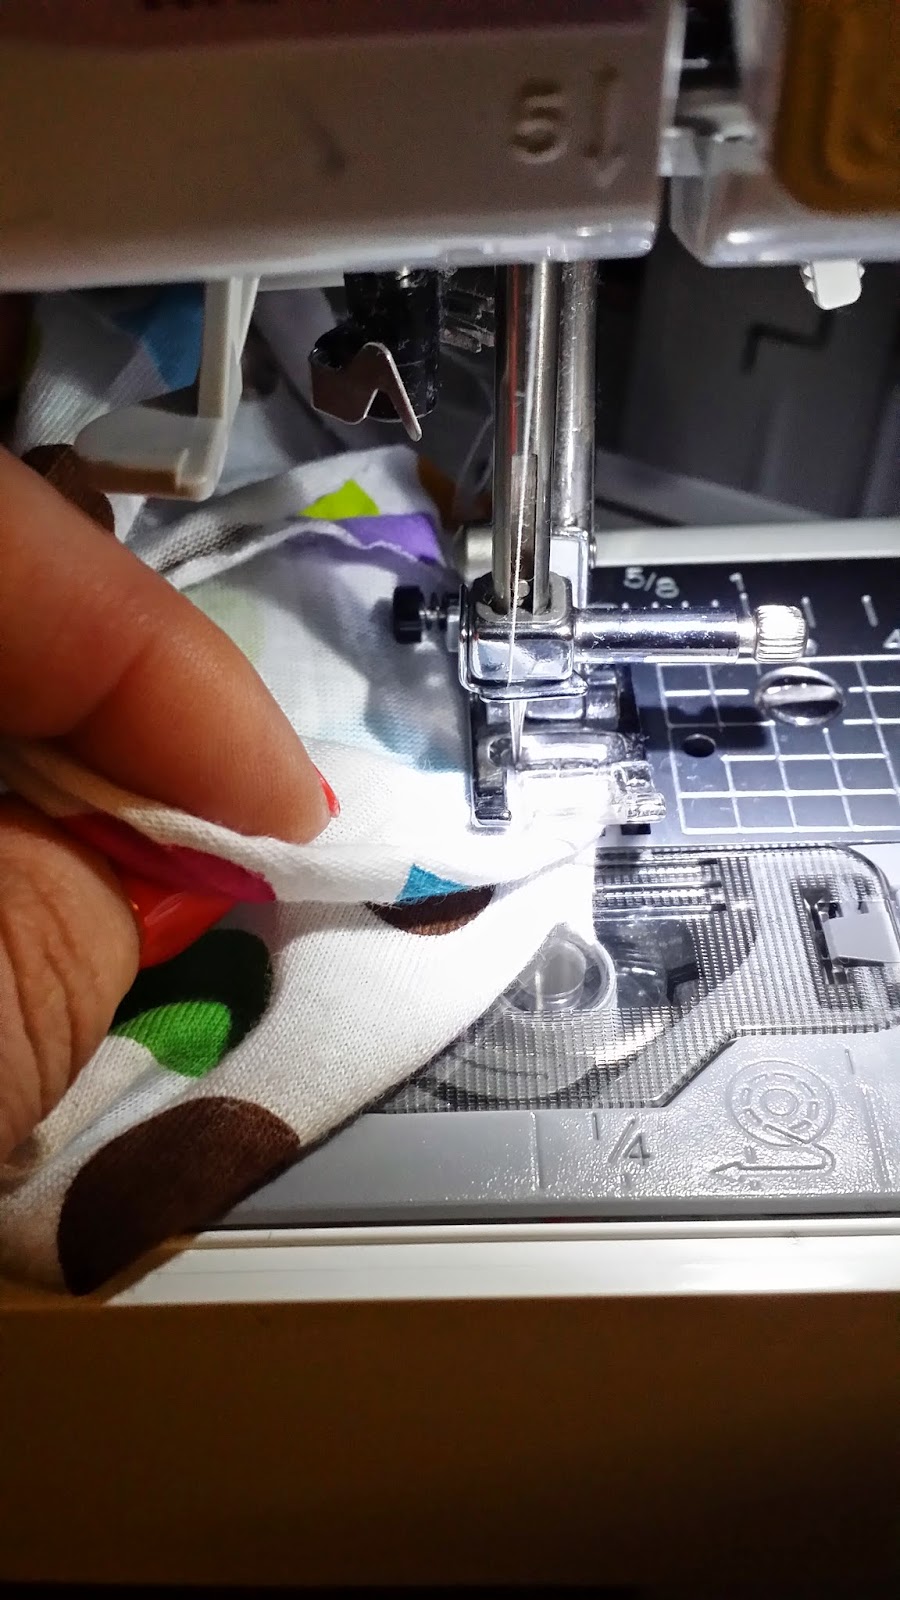
     Sew around the circle.
Start to sew around the circle.
     When you get to where you can't get all the way around, stuff the fabric through the hole to complete the circle.
Stitch as far as you can.
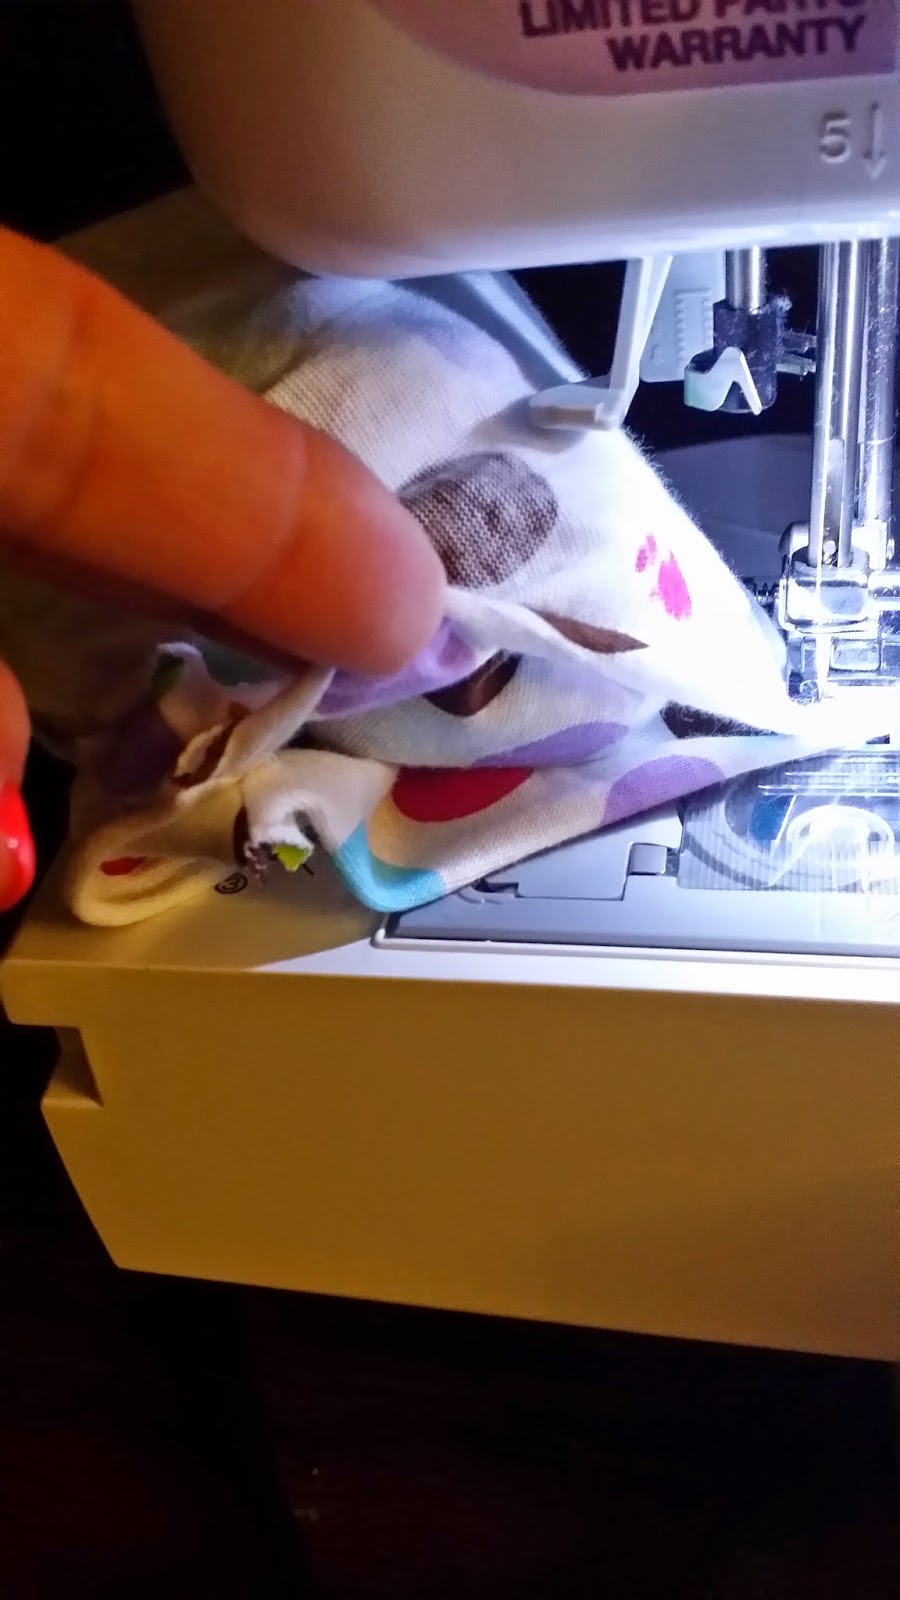
Stuff the fabric inside the remaining hole and finish stitching it shut.


    When you're done sewing, it'll look just like this.
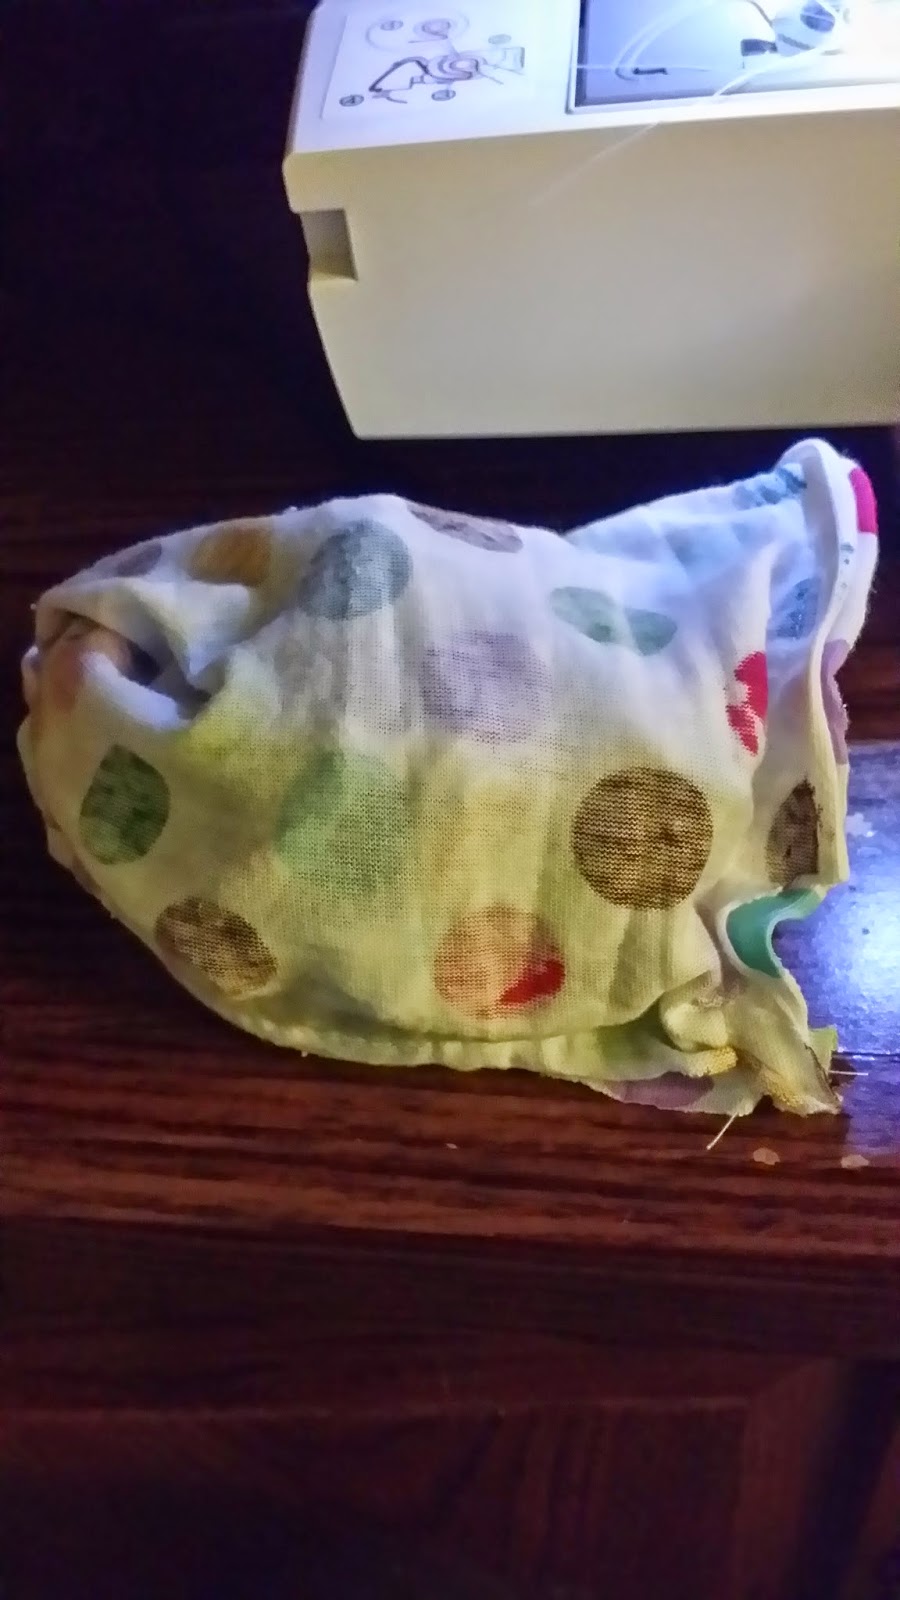
Finished sewing!
STEP 5: Turn it Out
     Unwad the unsewn end of your bundle and you'll see your belt is finished and just inside out. Turn it right side out and you're ready to go!
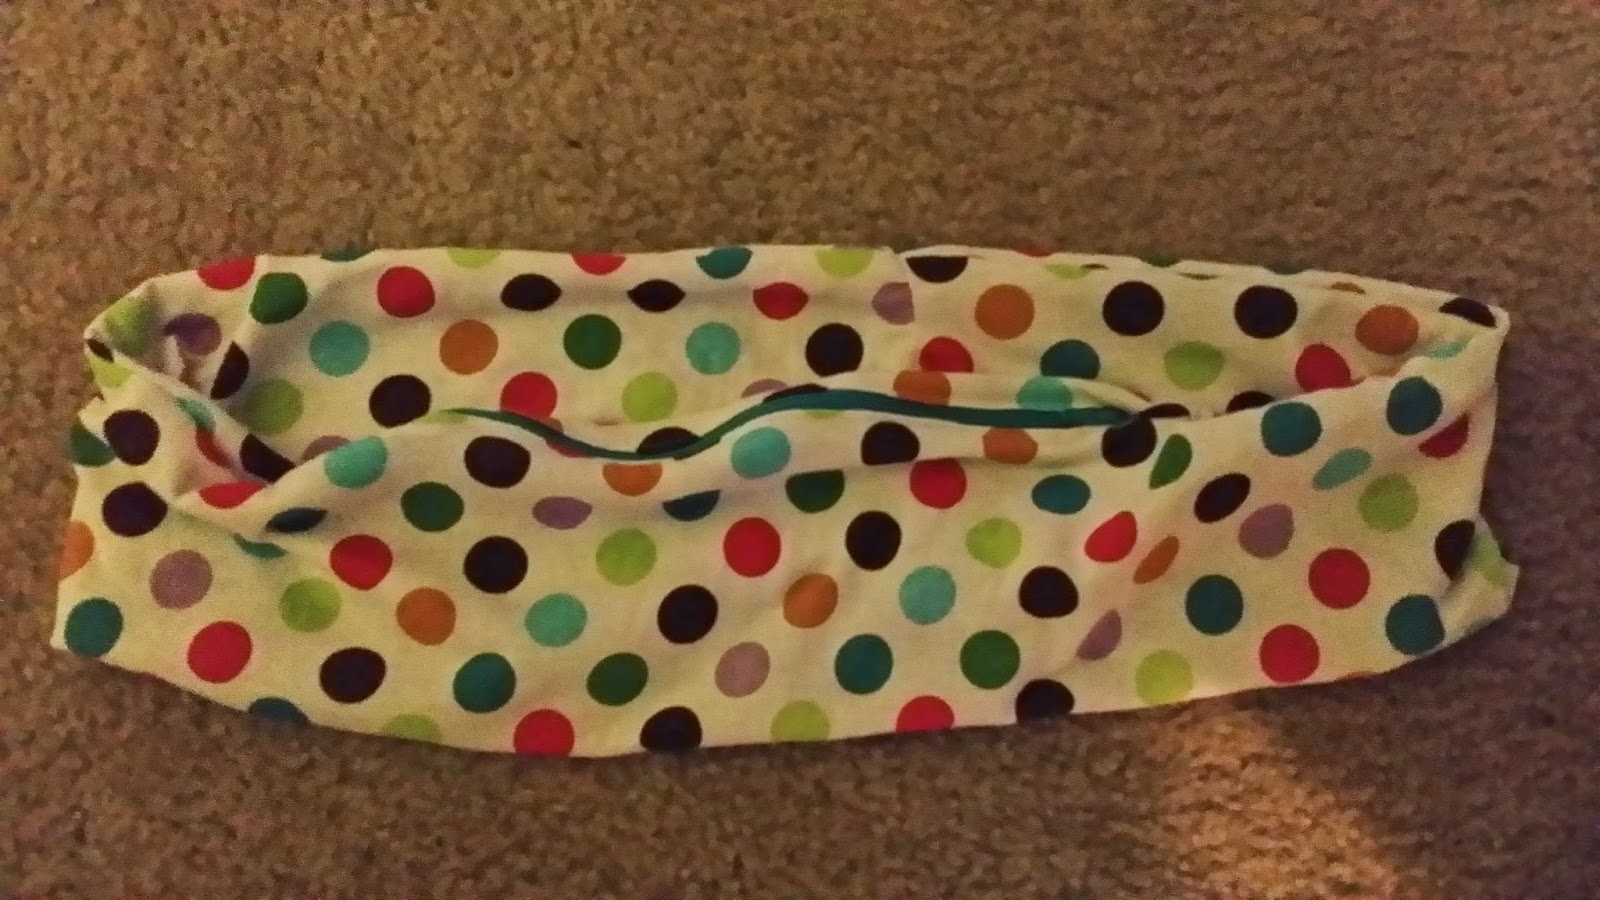
Finished belt!
     Now pop it on and fill it with your keys, phone, ID, etc and you're good to go!

NOTES:
  I used stretchy cotton and they use spandex. I chose cotton because I figured it wouldn't roll when I bent over. It doesn't, but I popped a few threads pulling it over my hips. In hindsight, if I make more I'll be making them out of spandex.

No Slip Headband


     I love walking. I hate hair in my sweaty face. I have fine, straight hair. Whenever I wear a fabric headband it slowly slides back on my head until it falls off. Whenever I wear a hard headband if it doesn't immediately slide off, it gives me a headache. 
     I knew there had to be something better so I went where I always go when I need answers. I was pretty sure the Bible didn't address what Naomi and Ruth wore when picking tares, so I went straight to the next best source for answers, Google. There I discovered Sweaty Bands. Just like with the FLIPBELT http://appalpie.blogspot.com/2014/09/running-belt.html  I knew I could have my own, cheaper, version of these ($17 each!) headbands in my hot little hands faster than I could get an order of these shipped to my door.
    
MATERIALS:
patterned ribbon
velvet ribbon (same width as patterned ribbon)
elastic
thread

STEP 1: Measure Your Head, Cut Ribbon and Elastic
     Run a tape measure around your head where you feel comfortable wearing your band. Subtract 4" for your elastic. Cut ribbon to this length. Cut 4" length of elastic.

STEP 2: Sew Ends Together
     Place right sides of ribbons together with elastic sandwiched in the middle. Sew.
right sides together with elastic in between
sew together the 3 layers
STEP 3: Sew up the Sides
     Flip the sewn end open so now your wrong sides are together. Top stitch down the length on both sides until about an inch from the end. I used a white top thread and black bobbin thread.
sides stitched together

STEP 4: Finish the End
     At the unfinished end, turn under the ends about 1/8" with the end of the elastic tucked inside. Top stitch it down. and you're done!
Finished band!


Ready to get sweaty!